[ ] *
Cameras *
Calculators *
Related Tech *
Images *
Sites & Supplies
Zoneplate [and Pinsieve or Pinplate]
Zoneplates are becoming increasingly useful as a way of focusing X-rays. They are used in X-ray telescopes in astronomy and in X-ray lithography for experimental printed circuit fabrication.
Basically the zoneplate is a way of doing non-lens photography similar to the pinhole but allows more light to get to the film. This makes the "effective" f-number smaller, allowing for shorter exposures. Practically, this means about 3 stops or 1/8 the exposure time. Not bad, this would bring F2048 to F256, a vast improvement.
This is one of the least understood areas of non-lens photography. It took me quite some time to find the proper equations and information. Most pinhole books and literature mention them, but don’t give enough information for the lay person to make his/her own. Well no more, the secret is about to be revealed!
[The Pinsieve [also called the pinhole sieve or photon sieve] is a new adaptation of the Zoneplate using small pinholes in place of the rings. See illustration at end of this page to see how they are related. See Guillermo Penate's site. Based on work from the Nature 414, 184-188 (8 November 2001) paper]
see MATH if you really want to know how this is done.
DEFINITION: ZONES - these are alternating areas of clear (or white) and opaque (or black).
By using a drawing program such as Corel Draw on the PC, we can draw out the Zone Plate at say 25X normal size quite easily.
We then photograph these drawings from the correct distance with the appropriate high resolution lenses and film, develop and mount the resulting image on our zone plate camera.
To make it easy, I have made an Adobe Acrobat PDF page with 6 zoneplate images, all at 25x normal size. [50mm, 75mm, 100mm, 150mm, 200mm, 300mm]
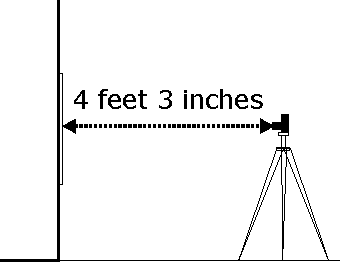
If you photograph this print-out from 4 feet 3 inches with a 50mm lens, you will get all 6 focal length zoneplates on one negative. [or a 36 exp roll will make enough for an entire class].
- print the zoneplates from this site. (or better yet, draw your own from the equations for better quality)
- paste to a larger sheet of white mount board.
- set against or attach to a wall that is evenly lit.
- measure off the required distance from zoneplate to camera.
- camera lens should be at exactly the same height as the center of the zone plate image.
- you should be directly in front of the zoneplate image, being to one side or the other will distort the image.
- take a series of exposures. bracket exposures +/- 2 stops in at least ½ stop intervals. (first time only, after you determine correct exposure you will not need to do this every time)
- process film for high contrast (see below)
- with high powered loupe, assess images and pick out the cleanest ones.
- cut out resulting image and mount to a brass shim with appropriate sized hole to allow the zoneplate to be visible. Mount to camera.

FILM & DEVELOPING: I recommend Kodak Technical Pan film TP-135-36, an extremely high resolution, high contrast film. It is best to bracket exposures. The film is VERY sensitive to exposure changes. In full sunlight the exposure will be around 1/1000 second at F5.6 / F8 (ASA 200). NOTE: F16 is usually not the best aperture to use. F8 tends to be sharper on most normal 35mm camera lenses.
You can also use a lith film. This will be hard to find in 35mm. You may have to buy in sheet format and cut to fit the back of your camera.
The BEST plates will be from development in lith developer. see Photographer's Formulary. This really makes a big difference in the resulting images made.
FOCUS
You will get an image if you mount one of these zoneplate and just use it. However, unlike pinhole "lenses", zoneplates need to be focused to get optimum results. Fortunately, so much more light comes though, at least in daylight conditions, you should be able to do this.

Pinsieve [or Pinplate] the overlapping image Zoneplate
PDF [481KB] of 50mm and 75mm 25X images of both Pinsieves and Zoneplates.