 CORE LAB
| CONTENTS | OVERHEADS | GLOSSARY | REFERENCES | SKILLS | CLASSIC | TROUBLE |
 CORE LAB
12/03/1998
|
SUMMARY: This lab is designed to provide students with a laboratory experience with sea urchins in which they will fertilize gametes and observe early developmental stages. In this investigation we will: 1. Induce spawning of gametes by injecting potassium chloride solution. |
|
| TIMING | BACKGROUND | MATERIALS | PROCEDURE | OBSERVATIONS | IMPLICATIONS | EVALUATION |
Studies of sea urchins provide information on fertilization and development that apply to all organisms from jellies to humans. These eggs, then, provide a model embryo for understanding development in all forms. It is important to observe early embryonic development because it is during this time that the patterns of development of the organism originate.
Sea urchin gametes are the same size as human gametes and development is very similar through the gastrula stage. Both sea urchins and humans are deuterostomes, meaning that patterns of cleavage are radial and the mouth arises at a site distant from the site of gastrulation. The name deuterostomes means second mouth. In contrast protostomes follow a spiral cleavage pattern and the mouth forms near the blastopore, the origin of gastrulation. See Classification tree. Notice the relationship between humans and sea urchins.
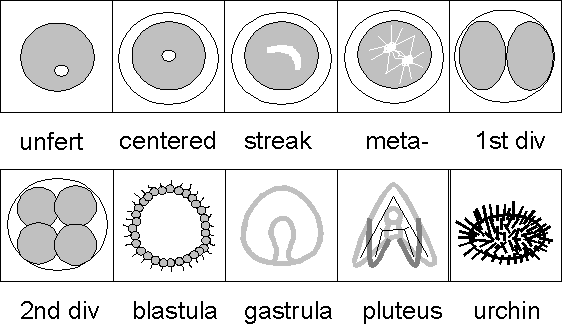
For a visual overview of events in this lab see PATH OF DEVELOPMENT
IMPORTANT - to maximize observations the first day, cultures of embryos should be started 1 1/2 and 3 hours before the class period. This will allow viewing of early cleavage stages. If you are teaching multiple periods remember to start cultures each period for subsequent periods to observe. See DETAILED timing and check-off list
To insure that there is at least one male and one female sea urchin it is best to have approximately 10 sea urchins on hand. (If sea urchins are being shared with multiple classes then save eggs and sperm and inject only one sea urchin for demonstration purposes.)
Inject 0.5 M potassium chloride into the sea urchin.
|
WARNING - ONLY TEACHERS should handle the syringe with the potassium chloride. Potassium chloride itself is not particularly hazardous, being the main ingredient in substitute salt formulations, but injection into a vein or artery can cause an electrical imbalance in the heart or in the brain resulting in death. |
>>> see animation
|
Note how the needle goes over the top of the teeth to inject KCl into the body cavity and not into the mouth.. Side View /\ and Top View \/ |
|
|
|
|
Males: see animation. sperm are a milky white color
|
Females: see animation eggs are pale yellow to orange to dark maroon, depending on species.
|
|
Appropriate sperm dilution is essential for successful fertilization. Too low a sperm concentration results in fewer eggs being fertilized (safer than too high). Too high a sperm concentration will result in polyspermy (more than one sperm per egg) and abnormal development of the embryo. There are a number of built in mechanisms to help prevent polyspermy, but they are not full proof and at very high sperm concentrations they can be overwhelmed.
see animations Just right sperm, Too many sperm, Too few sperm
Sperm Dilution:
A sperm dilution series is a useful way of showing just how few sperm are needed to fertilize eggs. For comparison purposes, it is important to use the same sperm concentration for each fertilization. Use a pasteur pipet to make the initial dilution . Mark a line part way up the narrow end of the pipet. see illustration below

Always use this quantity of sperm as the starting point for dilutions. Add "one notch" of sperm (2mm?) to 100ml of sea water (adjust this volume up or down if necessary to get proper fertilization levels without polyspermy). This is referred to as the STOCK SPERM SUSPENSION. A single drop of this suspension will be enough to fertilize 5 ml of a dilute egg suspension (1-2%). A single drop can be used to demo fertilization under a microscope. Although this is too many sperm for proper development, the embryos are unlikely to develop under a microscope for a variety of reasons (heat from lamp will make them too warm, the slide will dry out, etc.). This does, however, allow the student to witness, first hand, the raising of the fertilization membrane.
Eggs:
Eggs can be re-concentrated to allow for easier viewing by letting them settle in a beaker or test tube and pouring off the excess seawater.
To fertilize:
see animations:
A Time Lapse Video from Sea Studios of early events, 241K
Keep dilute cultures of embryos, at less than 1% concentration, in sea water no more than 1 cm deep or in slowly stirring cultures.
Timing:
This is different for each species and is HIGHLY temperature dependent (at warmer temperatures under a microscope, division is faster). examples:
|
species |
1st division |
2 nd division |
blastula |
gastrula |
pluteus |
|
L. pictus |
90' |
2.5 hrs |
24 hrs |
2 days |
5 days |
|
S. purp |
120' |
3 hrs |
24 hrs |
2 days |
5 days |
What you usually have to do is set cultures up at different times.
See STORAGE for suggestions on how to store gametes for long periods of time.
See DETAILS for timing suggestions on how to set up cultures.

This lesson is often done when mitosis and meiosis are discussed. Students will definitely be able to observe the first division, if they are present when it occurs, but may not see "centering", "streak" and "metaphase".
Students should keep careful records of when each of the recognizable development steps occurs. Detailed drawings are very helpful. If you are lucky enough to have two species or two different temperature environments, students can compare stages and rates of development.
See URCHIN animation (55K)